How to Vinyl Dye Your Parcel Shelf

I picked up a (formerly) black parcel shelf complete with premium rear speakers for my e30 at the junkyard. Here’s how I renewed this parcel shelf with some vinyl dye and sweat.

First, meet my parcel shelf, complete with plenty of dog(?) hair.

Original Parcel Shelf

Next, you need to prep it for dye. This involves removing all the accessories, like the speakers, third brake light, vents, and seat belt trim. If your’s has a hair problem like mine, a lint roller will do wonders to clean it up. Remember – the key to a good final product is in the preparation!

Prepped Parcel Shelf

All prepped!


DuplicolorNow, get yourself a couple cans of vinyl dye. I used Duplicolor as seen here. One can will probably get the job done, but pick up two to be safe. Spray many light, consistent coats in many directions to get full coverage. Vinyl dye is more forgiving than spray paint, but if you go heavy in one place – well, you’ll need to go heavy everywhere for it to look right! You will be fine just spraying dye on the parcel shelf, but for carpet or other “deep” fabric, the dye will need to be brushed into the fabric for full coverage. Once you get one good coat, let it dry for 15-30 minutes, then hit it again. I went with at least three coats to achieve my final finish. Again, vinyl dye is forgiving – it doesn’t really run and just gets absorbed into the material, but heavy applications will make cloth materials feel stiff.


Here’s my first coat

First Coat


And eventually you’ll end up here, the bottom result. The top was dyed by my friend and requires more coverage. On the plus side, it’s been exposed to constant sun for over a year and has not faded!

Final Product

LED Tag Lights

One of the tag lights was out on my e30 making for a good mod opportunity. I figured LED lighting would help update the look of car, so I ordered these guys from Amazon.

E30 Rear at Dusk

E30 rear at dusk with LED tag lights

They look good to me! I know the camera doesn’t do the best job, but just compare the license plate white to the yellow light given off by the incandescent lights in the background!

New LEDs!

New LED lights on the left, comparison of the original halogen light vs an LED light right

Installation is a snap too. Just find your tag lights, remove the screws (hopefully they’re not as rusty as mine!), pop the light out, replace the old halogen lights with the LED replacements, and reinstall. Be sure to test the LEDs prior to reinstallation – direction matters. Also be sure to orient the LED facing down.

Install Process


Here’s a quick comparison of new vs old:

Old halogen light (left) vs new LED light (right)

Old halogen light (left) vs new LED light (right)

Note: The LED rotated in its socket as I installed it for this shot. The new LEDs are actually much brighter (as seen in the opening shot).

6 Tips for Great Kodachrome Scans with Nikon Scan

I’m still learning, but slowly perfecting Kodachrome scans. My preferred software package for working with Kodachrome is the good ‘ol Nikon Scan. If you are running Windows 7 x64, don’t fret, I have a solution for you here.

Okinawa 1952

Okinawa 1952

1. Use the Kodachrome profile in Nikon ScanKodachrome Profile

Nikon has already done the hard work for you and profiled Kodachrome which has a unique color signature. Use this to your advantage and select the “Kodachrome” profile in Nikon Scan to see nicely color corrected scans!

Kodachrome Profile vs Standard

Kodachrome Profile (left) vs uncorrected Epson V330 scan (right)

2. Use the “Fine” Digital ICE setting

Kodachrome is exceptionally challenging film to scan and only the Nikon Super Coolscan 9000 ED is capable of perfect dust & scratch removal. The Coolscan V & Super Coolscan 5000 have a special Kodachrome version of Digital ICE that does a pretty good job of removing dust and scratches without futzing up the detail. Use it! For more damaged slides, change to the default “Positive” profile and select “Normal” Digital ICE. This will lose detail, but also better correct your scans. I find “Normal” Digital ICE correction to be too light handed to be useful in the Kodachrome profile. While using the “positive” profile, your Kodachrome slides will exhibit a dreadful color cast. You can get close to correcting this by enabling “Digital ROC” at level 5 and dialing in -48 red, -44 green, and +4 blue in the Color Balance section.

ICE Comparison

“Positive” with “Normal” ICE (top), “Kodachrome” with “Fine” ICE (middle), “Kodachrome” without ICE (bottom)

3. Scan with the emulsion (dull) side facing down

For the best quality scans, scan with the emulsion side of your slides facing down, towards the sensor. You can tell which side is the emulsion side by looking for the dull side of the film – the other side will be glossy.

4. Clean your slides prior to scanning

Digital ICE is not a golden parachute. Your scans will look better with less correction, so clean them (or at least dust them) prior to scanning. Your scanner will thank you too!

 5. Use the Analog Gain settings to your advantageAnalog Gain

Some slides may be appear to be overexposed or underexposed so badly that they are not salvageable. Fear not! Analog gain changes the backlight intensity / scan speed allowing new life to be breathed into these slides. It works like exposure on a camera – add gain for underexposed, dark slides and subtract gain for overexposed, overly bright slides. You will be surprised what can be recovered! For more advanced users, tune analog gain to be as positive as possible without blowing the highlights to reduce the noise in your scans.

Gain Comparison

+.71 analog gain (left), no gain adjustment (right)

 6. Scan and save using the highest quality available.

Scan using the highest bit-depth available, 14-bit for the Coolscan V and 16-bit for the LS-5000, and save the output as a TIFF. At 4000 DPI, this will create 100+ megabyte files. This allows edits to made using the highest quality source and will render a better final output. Once you are done any edits, the original TIFFs can be deleted – or better, archived for future use.

Nikon Coolscan V and Kodachrome

In conjunction with the telecine project (updates soon!), I purchased a Nikon Coolscan V, also known as the Nikon LS-50, to scan in my Grandfather’s 35mm Kodachrome slides from the early 1950s. The Coolscan V is appealing for its 4000 dpi optical resolution and a fourth version Digital ICE automatic dust removal. However, Digital ICE does not work with all films.

Kodachrome slide from 1952

Kodachrome slide from 1952 with Digital ICE

ASF’s, now Kodak’s, Digital ICE performs automatic dust and scratch removal – the ICE being short for “Image Correction and Enhancement.” It works by scanning a fourth, infrared, color layer in addition to the conventional red, green, and blue layers that is used to create a dust mask which is later subtracted from the scan. The infrared light is expected to pass through the film emulsion but not through dust. So why doesn’t it work with all films? It turns out that black and white film uses silver nitrate for the emulsion layer, and silver nitrate also blocks infrared light, rendering Digital ICE useless. So now you’re probably asking, “So what does all this have to do with Kodachrome? It’s color!”

Kodachrome is not a normal color film and shares more in common with black and white film than color negatives or the typical color reversal (positive) film. This is easily illustrated by looking at a Kodachrome emulsion which has a 3D appearance – these are the color layers in the film, and each color layer is very similar to traditional black and white film. In fact, Kodachrome starts out as black and white only to slowly become color during its long and convoluted development process. These days Kodachrome can no longer be developed as color film because the chemicals necessary for development are long out of production. Owing to its similarity to black and white film, old, undeveloped Kodachrome can still be developed in black and white!

So how does the Coolscan V’s implementation of Digital ICE work with Kodachrome? The answer is “it sort of does.” The Coolscan V does a good job with removing dust and an alright job removing defects from a slide. That’s where the good ends – Digital ICE detects strong contrast areas as defects and tries to remove them, leading to blurry images with noticeable defects at 100% crop. Where real defects, like scratches, exist, a mark is often left on the image although it is significantly less noticeable than an uncorrected scan. Furthermore, I have noticed instances where defects are seemingly introduced to the scan.

100% crop with Digital ICE

100% crop with Digital ICE

Pay particular attention to the orange handle and the sailors’ faces. ICE detects these fine details as defects and completely mangles the image. I think the Coolscan V still manages to extract more detail with ICE enabled than my Epson V330 flatbed does without ICE.

100% crop without Digital ICE

100% crop without Digital ICE

Digital ICE reduces images sharpness when fully enabled, even when used properly with color negatives. This side effect is worsened with Kodachrome – even at web sizes, the loss of sharpness is clearly apparent.

With and without ICE

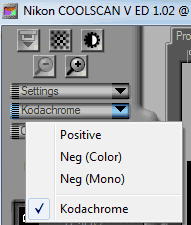
ICE (Fine) on the left, without ICE on the right. Scanned using the “Positive” setting, not Kodachrome.

Even with the Coolscan V’s more advanced fourth version of Digital ICE, it is clear that Kodachrome does not play well. Home users will likely be happy with the results, but a professional will not. There is exactly one scanner on the market that can properly remove dust and scratches from Kodachrome, and that is the Nikon Super Coolscan 9000. I will continue to leave Digital ICE enabled since the corrected, dust free slides look much better than sharp and dusty slides to my eyes.
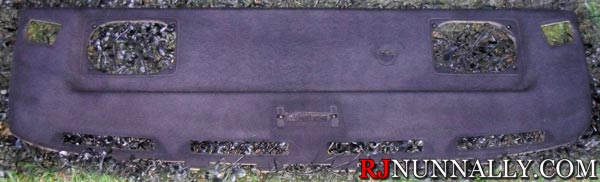
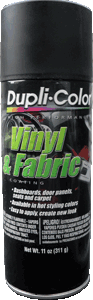
 

Nikon Coolscan V on Windows 7 x64

Even though Nikon does not officially support their film scanners on Windows 7, they will work with a little effort. I own the Nikon Coolscan V, sometimes referred to as the Nikon LS-50, but these instructions also apply to the some of the other Nikon film scanners such as the the Coolscan 5000 (LS-5000), Coolscan 4000 (LS-4000), Coolscan 8000, and the Coolscan 9000.

Disclaimer – these instructions have been adapted from http://www.exposedvisions.com/Win7%20Scans.htm. You will need to download my .inf for the Coolscan V (itself modified from Steel Chn’s version), but otherwise credit goes to Andrew Minton at exposedvisions.com.

Download the required files

  1. Begin by downloading Nikon Scan 4 from Nikon here. You want the 32-bit Vista edition. Don’t worry, it will install just fine under Windows 7 x64.
  2. Next, download my scanners.inf here. Unzip it in a location of your choosing.

 Install Nikon Scan

(Note – if you have Vuescan installed, uninstall it now. You can reinstall Vuescan later.)

  1. Install Nikon Scan. It should install uneventfully and create the folder C:\Program Files (x86)\Nikon\NkScan4\
  2. Create a new folder inside of NkScan4. Copy your extracted scanners.inf into the new folder you just created. I called my folder “NikonFiles”
  3. Navigate to C:\Program Files (x86)\Common Files\Nikon\Driver\ScanUSB (Scan1394 for Firewire equipped scanners) and copy “NKScnUSD.dll” to the folder you created in step 2. You should now see “scanners.inf” and “NKScnUSD.dll” in this folder.
  4. If you haven’t already, plug in your scanner, being sure it is turned on.
  5. If windows asks you for a driver, you can point it to the scanners.inf file located in the folder you created in step 2. Otherwise, open your device manager (start -> right click on my computer -> manage -> device manager), open “other devices”, the right click on “unknown device” and select “Update Driver Software.” This device will have a yellow exclamation icon next to it. Select the second, bottom option  labeled “Browse my computer for driver software” then enter “C:\Program Files (x86)\Nikon\NkScan4\NikonFiles” as the location, substituting “NikonFiles” for the folder you created in step two. Press next and the scanner will install. If a warning comes up that says the driver/software cannot be validated (I forget the exact message), select continue.
  6. The scanner should now be installed and Nikon Scan should work as intended. If you use Vuescan, you can install it now.


35mm Film Scan

35mm film scan of my 318i convertible in 2006