
I’m still learning, but slowly perfecting Kodachrome scans. My preferred software package for working with Kodachrome is the good ‘ol Nikon Scan. If you are running Windows 7 x64, don’t fret, I have a solution for you here.

Okinawa 1952
1. Use the Kodachrome profile in Nikon Scan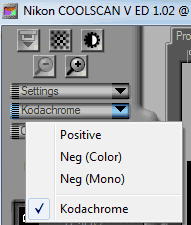
Nikon has already done the hard work for you and profiled Kodachrome which has a unique color signature. Use this to your advantage and select the “Kodachrome” profile in Nikon Scan to see nicely color corrected scans!

Kodachrome Profile (left) vs uncorrected Epson V330 scan (right)
2. Use the “Fine” Digital ICE setting
Kodachrome is exceptionally challenging film to scan and only the Nikon Super Coolscan 9000 ED is capable of perfect dust & scratch removal. The Coolscan V & Super Coolscan 5000 have a special Kodachrome version of Digital ICE that does a pretty good job of removing dust and scratches without futzing up the detail. Use it! For more damaged slides, change to the default “Positive” profile and select “Normal” Digital ICE. This will lose detail, but also better correct your scans. I find “Normal” Digital ICE correction to be too light handed to be useful in the Kodachrome profile. While using the “positive” profile, your Kodachrome slides will exhibit a dreadful color cast. You can get close to correcting this by enabling “Digital ROC” at level 5 and dialing in -48 red, -44 green, and +4 blue in the Color Balance section.

“Positive” with “Normal” ICE (top), “Kodachrome” with “Fine” ICE (middle), “Kodachrome” without ICE (bottom)
3. Scan with the emulsion (dull) side facing down
For the best quality scans, scan with the emulsion side of your slides facing down, towards the sensor. You can tell which side is the emulsion side by looking for the dull side of the film – the other side will be glossy.
4. Clean your slides prior to scanning
Digital ICE is not a golden parachute. Your scans will look better with less correction, so clean them (or at least dust them) prior to scanning. Your scanner will thank you too!
5. Use the Analog Gain settings to your advantage
Some slides may be appear to be overexposed or underexposed so badly that they are not salvageable. Fear not! Analog gain changes the backlight intensity / scan speed allowing new life to be breathed into these slides. It works like exposure on a camera – add gain for underexposed, dark slides and subtract gain for overexposed, overly bright slides. You will be surprised what can be recovered! For more advanced users, tune analog gain to be as positive as possible without blowing the highlights to reduce the noise in your scans.

+.71 analog gain (left), no gain adjustment (right)
6. Scan and save using the highest quality available.
Scan using the highest bit-depth available, 14-bit for the Coolscan V and 16-bit for the LS-5000, and save the output as a TIFF. At 4000 DPI, this will create 100+ megabyte files. This allows edits to made using the highest quality source and will render a better final output. Once you are done any edits, the original TIFFs can be deleted – or better, archived for future use.