How to Vinyl Dye Your Parcel Shelf

I picked up a (formerly) black parcel shelf complete with premium rear speakers for my e30 at the junkyard. Here’s how I renewed this parcel shelf with some vinyl dye and sweat.

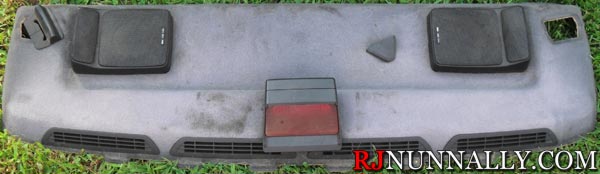
First, meet my parcel shelf, complete with plenty of dog(?) hair.

Original Parcel Shelf

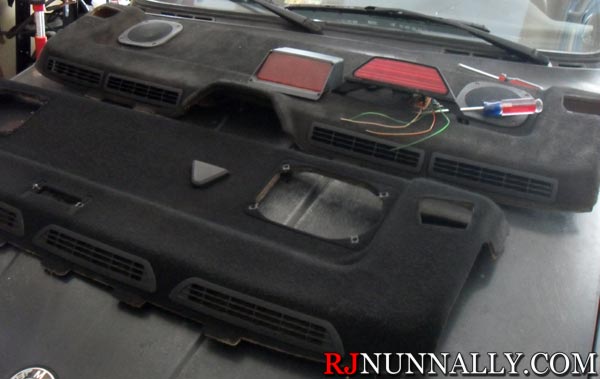
Next, you need to prep it for dye. This involves removing all the accessories, like the speakers, third brake light, vents, and seat belt trim. If your’s has a hair problem like mine, a lint roller will do wonders to clean it up. Remember – the key to a good final product is in the preparation!
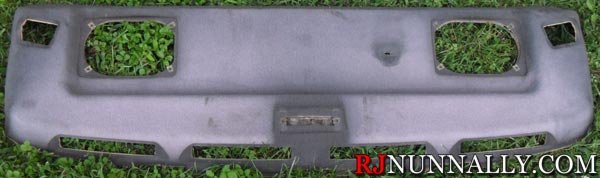
Prepped Parcel Shelf

All prepped!


Duplicolor
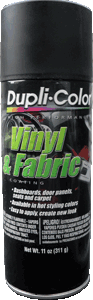
Now, get yourself a couple cans of vinyl dye. I used Duplicolor as seen here. One can will probably get the job done, but pick up two to be safe. Spray many light, consistent coats in many directions to get full coverage. Vinyl dye is more forgiving than spray paint, but if you go heavy in one place – well, you’ll need to go heavy everywhere for it to look right! You will be fine just spraying dye on the parcel shelf, but for carpet or other “deep” fabric, the dye will need to be brushed into the fabric for full coverage. Once you get one good coat, let it dry for 15-30 minutes, then hit it again. I went with at least three coats to achieve my final finish. Again, vinyl dye is forgiving – it doesn’t really run and just gets absorbed into the material, but heavy applications will make cloth materials feel stiff.


Here’s my first coat

First Coat


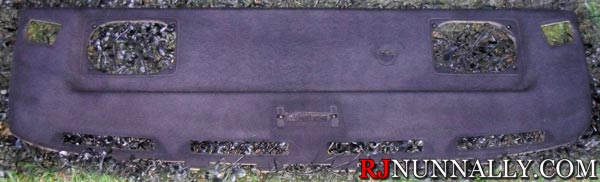
And eventually you’ll end up here, the bottom result. The top was dyed by my friend and requires more coverage. On the plus side, it’s been exposed to constant sun for over a year and has not faded!

Final Product

LED Tag Lights

One of the tag lights was out on my e30 making for a good mod opportunity. I figured LED lighting would help update the look of car, so I ordered these guys from Amazon.

E30 Rear at Dusk

E30 rear at dusk with LED tag lights

They look good to me! I know the camera doesn’t do the best job, but just compare the license plate white to the yellow light given off by the incandescent lights in the background!

New LEDs!

New LED lights on the left, comparison of the original halogen light vs an LED light right

Installation is a snap too. Just find your tag lights, remove the screws (hopefully they’re not as rusty as mine!), pop the light out, replace the old halogen lights with the LED replacements, and reinstall. Be sure to test the LEDs prior to reinstallation – direction matters. Also be sure to orient the LED facing down.

Install Process


Here’s a quick comparison of new vs old:

Old halogen light (left) vs new LED light (right)

Old halogen light (left) vs new LED light (right)

Note: The LED rotated in its socket as I installed it for this shot. The new LEDs are actually much brighter (as seen in the opening shot).

eBay 24v e30 longtube header update

After fitting the longtube headers per this post, I had to fabricate the rest of the header back exhaust. I completely green fielded this exhaust and opted to go completely custom rather than try to adapt an e30 or e36 catback. My plan was to Y the headers together into a single 3″ exhaust pipe and run a rather loud Thrush 17661 Welded Muffler. Due to packaging challenges, I wanted to make the Y section removable so that the headers can be removed or installed with the engine in the car.

Trying to wear out the credit card

Exhaust parts – or trying to wear out the credit card

Close Up

Exhaust parts - Close up


So, what all did I order?

  1. 24x 7mm copper exhaust nuts (exact item on amazon)
  2. 2″ Stainless Steel Mandrel Bend 45 Degree Elbow(eBay)
  3. 2x 2″ stainless steel v-bands (eBay)
  4. 3.0″ Stainless Steel V-Band (eBay)
  5. 3.0″ Mild Steel V-Band (eBay)
  6. ER309L Stainless Steel MIG Welding Wire 2-Lb Spool 0.030″ (0.8mm)(.023 pictured, .030 is probably more appropriate)
  7. 3″ Stainless Steel Straight Tubing – 1 Foot (12″)
  8. 3″ Mild Steel, 180 Degree Mandrel Bent Elbow (didn’t use)
  9. 3″ aluminized / mild steel exhaust tubing
  10. Thrush 17661 Welded Muffler
  11. O2 Sensor Ring, Weld-on, Mild Steel, 18mm x 1.50 Pitch

I started by breaking out a spare head and mounting the headers so that I could mock the Y section up off the car.

Mocking up exhaust - Part 1Note that these cheap headers neck down to 1.75″ on side but stay 2″ on the other side… very odd indeed. I tacked on the first 2″ v-band for fitment in this picture. Also notice that the 1.75″ side has a bend that causes it to intersect & interfere with the other side. This is fixed by cutting it at the bend.

header mock-up part 2


And another angle

header mock-up part 3

I should also take the time to mention that I have very little experience with welding, so please take it easy on me! The 2″ sleeve clamp pictured came with the headers and I actually decided to use it after seeing how tight the clearance would be with two v-bands – perhaps I’ll update the design to use both v-bands in the future. I continued to work on the Y and used the 2″ stainless tubing with the 45″ mandrel bend to make the Y.

Y mockup


This was then dumped into a 3″ stainless steel tube. I clamped one end of the 3″ tubing in a vice until it was flattened to 2″ on one side.

Flattened 3" tubing


Then it was all welded up, and a 3″ stainless v-band was welded on.

Y


I didn’t want to spend a lot of money at this time, so I continued the rest of the exhaust in aluminized, mild steel. Stainless steel and mild steel expand at different rates and should not be welded together, although ER309L can do it. Because they expand at different rates, any welds between stainless & mild steel tend to crack after they have been heat cycled many times. I addressed this problem by using the v-band as the transition point. I bought identical 3″ stainless & mild-steel v-bands, then used one stainless v-band and one mild steel v-band to join the mild steel exhaust to the stainless exhaust. The mild steel exhaust section is not pictured as it is very simplistic.

Y under the car

Fitment under the car

And showing where the 3″ section begins under the car

Fitment under the car part 2

Finally, here’s the end product

E30 exhaust

Video:

Closing notes – the exhaust is LOUD and raspy. When I say, I actually got pulled over on the way back from the alignment shop, maybe 12 miles after the car was running. The LEO said, and I quote, “Dude, your exhaust is WAY too loud. I heard you a mile away!” I would suggest getting a different muffler or at least adding a resonator. The 3″ tubing is also very large. 2x 2″ exhaust actually flows better, but it doesn’t hang as low under the car. The 3″ hangs low under the rear subframe and looks like it could easily scrape. Other than that, it worked out pretty well!


How-to Rebuild Fuel Injectors

Do your fuel injectors need a refresh? Here’s how to rebuild them.

First, you need to buy a rebuild kit. This will include the filters, o-rings, pintle caps, and spacers required to rebuild your injectors. I bought my kit on eBay. If you just want to replace the o-rings, you can buy a “seal kit” instead, like this one.

Next, you need to gain access to your fuel rail, pop off any retaining clips if you have them, and then remove the fuel injectors themselves.

BMW M50 Fuel Injectors & Rebuild Kit

Now mount a wood screw (included in my rebuild kit) that is just large enough to fit inside the injector opening on a vice. Fuel injectors have small, integrated filters inside of them that can clog over time. We will be replacing these filters.

Wood Screw

Carefully thread the injector onto the screw until a few threads bite in, then pull the injector away from the wood screw until the filter comes out. This might be difficult.

bmw_m50_fuel_injector_rebuild-3

Fuel injector threaded onto wood screw

If you are successful, you should see this:

bmw_m50_fuel_injector_rebuild-4

Removed fuel injector filter

Repeat for all your fuel injectors, in my case 6. At this point, you can optionally clean your fuel injectors using fuel injector cleaner. I may cover this at a later date, but I elected not to clean my injectors this time around. Cleaning is a more complicated process – some people have even built elaborate cleaning rigs to pump fuel injector cleaner through the injectors automatically!

Now *carefully* remove the pintle caps and also remove the o-rings. Do not simply yank the pintle caps off with pliers as it is possible to damage them.

Pintle cap, o-ring, and spacer removed

Pintle cap, o-ring, and spacer removed

And then remove the o-ring from the other end.

O-ring removed

O-ring removed

Installing the rebuild kit is simple. Start by installing the new filters. They simply press into place – use a tack hammer to lightly tap them in until flush. Then install the top o-ring by rolling it onto the injector. Finish up by installing the spacer (if needed), o-ring, and pintle cap on the bottom of the injectors. The pintle caps easily snap into place and hold the spacer & o-ring on.

Rebuilt injectors

Rebuilt injectors

Finally, reinstall them on your car!

Newly installed fuel injectors

Newly installed fuel injectors

Happy motoring!

BMW M50 Power Steering Delete Belt

My e30s both have their power steering deleted, but the M50 from the later e36 uses a serpentine belt that drives the water pump, alternator, and p/s pump all at the same time making impossible to “just remove the belt” to prevent the p/s pump from running like on the old M20 or the early M42. However, there is a solution – by completely unbolting and removing the p/s pump from the M50 a different, shorter serpentine belt can used with an alternate routing to effectively delete the power steering. You should not run the p/s pump without fluid. Different part numbers are thrown around, generally ranging from a 6PK1400 to a 6PK1415, with 6PK1410 in the middle. Let me decode those numbers – the first “6” means the belt is a 6 rib serpentine belt and basically determines the width. This stays constant. The last four numbers are the belt length in millimeters, making a 6PK1400 belt 1400mm long. That’s simple enough.

I kept my idler pulley (the one above the alternator) and successfully fitted a 6PK1420 Serpentine Belt from Advance Auto (Part # 560K6). This belt, as mentioned above, makes it 1420mm in length. It was a snug fit, but not quite as tight as the factory belt, so I’m sure a 6PK1415 could also be used. Some people elect to delete the idler too and use a shorter belt; I would recommend keeping the idler as it gives the belt more grip on the alternator & water pump.